What is sublimation?
Simply put, sublimation is a printing method that transfers a design into fabric using ink and heat. This allows the ink and fabric to come together to create a permanent full-color drawing. If you use a proper poly blend, the design is less likely to fade, crack, peel, or wash off because the ink is embedded in the fabric. The results are better than simply applying a design with heat transfer vinyl, because the sublimation method creates a much stronger bond with the substrate. We own a dye sublimation printing company in Dallas so we will discuss this method of printing in detail.
As mentioned, using a 100% polyethylene or polyester blend is best when using sublimation methods. This is because the ink binds to the polyester fabric. You can use a 100% cotton or a higher quality cotton/poly blend, but the image won’t be as clear and will look washed out. If you want to achieve a vintage look, this might work!
You may be wondering how fabric bleaching helps sublimation? It’s not necessary when sublimating onto a white polyester fabric, but if you choose a darker polyester blend fabric, bleaching will help make your design pop. However, the design binds to the fabric and makes it brighter. Bleaching creates unique characteristics and effects on shirts, especially when combined with a sublimation design. This method is extremely popular right now because it allows people to showcase their personality and style.
How to get a sublimation design
When you start making t-shirts, it can seem like a daunting task and you may wonder how you can get all the latest and greatest sublimation designs. It’s really very simple: all you have to do is search on various platforms that offer designs. Creative Fabrica offers a large selection of different designs that can help you create an amazing and inexpensive t-shirt.
If you can’t find what you’re looking for or are interested in designing on your own, this goal is highly achievable! Making your own drawings is a fun way to express your creativity, but it also comes with a learning curve. There are several design programs you can use to create drawings, such as Photoshop, so you may need to learn how to use these different programs to get the types of drawings you want to make.
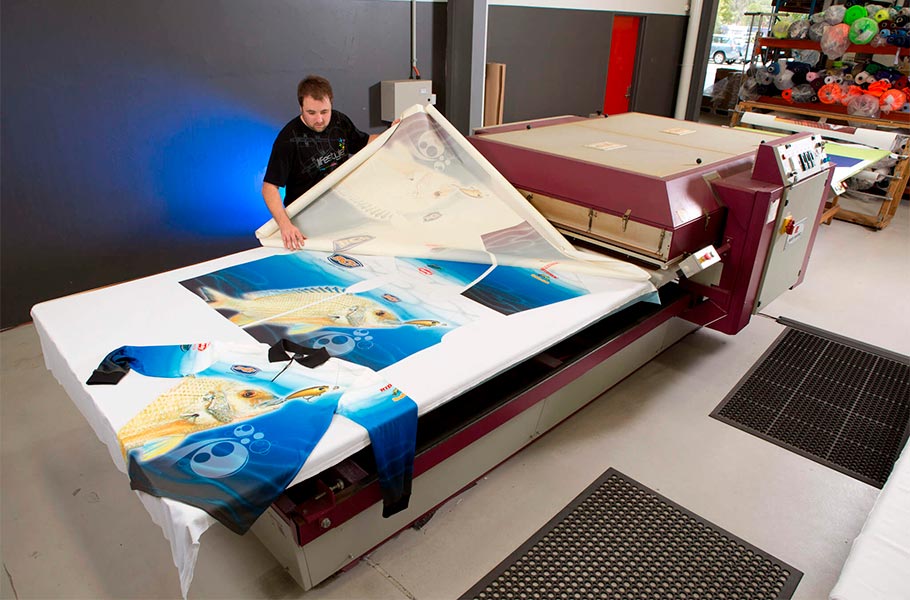
One important thing to remember when creating your own designs is that you need a sublimation printer. There is always the option of sending your designs to a printing company, but ultimately it is more cost effective to print them yourself. You can purchase a dye-sublimation-only printer or you can convert a printer. Purchasing a sublimation printer can be expensive when you start creating designs. An economical way is to convert a sublimation printer. Most Epson Ecotank printers can be converted, but you’ll need to do some research to figure out which printer is best for your needs and how to convert it.
How to correctly apply a sublimation design
Now that you’ve printed your design, you’re ready to apply it to your t-shirt! This is the most exciting part and you don’t want to get it wrong. To avoid doing this, you need to have the right tools. Using a home iron or Cricut EasyPress won’t work for applying your design, because there isn’t enough pressure or heat coverage. Do yourself a favor and purchase a heat press. To get started you can purchase cheap heat presses from online retailers, but for extended use you will want to purchase a quality heat press which may cost more.
Temperatures and times vary, but in general it is recommended to press a sublimation design for 60 seconds at 400° Fahrenheit (or 204° Celsius). Not all heat presses are created equal, so purchasing a temperature heat gun is a valuable investment. This way you can test the straightener to see what temperature it sets at and if there are any areas that differ from the set temperature. This way you will be able to know with greater certainty what temperature to set for your heat press, so as to avoid burning the shirt or other materials on which you wish to sublimate.
Whitening 101
*Before everything else, remember that bleach is a chemical and always keep it out of the reach of kids and dogs. If working indoors, ventilation and PPE must be adequate due to the danger of fumes*
There are various methods for applying bleach, such as using a spray bottle or a brush. Before applying bleach to your shirt, be sure to put a barrier on the inside of your shirt so the bleach doesn’t saturate the back. Cardboard, garbage bags or bag lids can work! In my personal experience, cardboard shirt forms work very well because you can slide your shirt onto them and see where the bleaching and design will be placed. They can usually be purchased at your local craft supply store or online.
There is no way to whiten a shirt – this is where your creativity comes in! You can create a boxed area if that seems right for your project, or spray paint a general area to give a more unique look. The possibilities are endless and the most important thing is to have fun! There are so many types of designs that absolutely any whitening method or look will work.
To speed up the process of turning bleach white, you can use a light source. You can place the shirt outside when it’s sunny or under a lamp if you work inside. Be careful when inside and take the correct measures to ensure your safety, as mentioned above. The whitening process will take longer if it is not done under some light source, but it is not necessary.
To stop the whitening process, you will need to apply hydrogen peroxide to the fabric. This will help keep the bleach from getting in the areas of your shirt that you don’t want bleached. Simply put hydrogen peroxide in a spray bottle and lightly spray on the bleached areas. Wait for the shirt to dry before proceeding further. Once the shirt is dry, put it in the washing machine. Don’t add fabric softener, but a little detergent is fine. Once you’ve finished washing, place it in the dryer as usual. Again, there are no fabric softener sheets and you can also hang them to dry.
Sublimation Design – Wear before or after bleaching?
If you want to keep a brighter design, I recommend applying your sublimation design to an already bleached t-shirt. You can do it either way and the process will work just fine. However, placing a bleached shirt under the heat press sometimes causes burns. It will create a yellow cast on the bleached portion of the shirt. There is no need to worry because just spray some hydrogen peroxide to eliminate the burning! I lightly mist the burned area and then lower the heat plate to speed up the process of clearing the burn. Do not press the plate again, or you may have to repeat the steps or ruin your shirt.
Here is a comparison between applying a design on an already bleached shirt and applying the design after bleaching:
Do what’s easiest and what works for you! Happy whitening.
Learning how to whiten shirts and then apply a sublimation design takes time, patience and practice. Trust yourself and the process and always do research if you are unsure about a method or process. The more you learn, the better you will become at creating our amazing shirts!